21 February 2018, update: the new JupyterLab was just released, and according to this tweet is really easy to integrate with Matlab. Probably worth checking out instead of the reasonably outdated instructions below!
I really like Python’s philosophy, but over the last years I haven’t been able to switch the code for my research from Matlab. At this point, the transition costs are too high for me, but it’s a move I have planned for some point in the future.
Now, Python has the awesome Jupyter (formerly IPyton notebook) feature, that allows for comments, code, and most importantly graphical output (i.e. figures you’ve just generated) to be shown in one document. This is a great way to share and explain the code you’re writing, since the reader immediately sees how output is generated without having to run all the analyses themselves.
Matlab has a Publish function that attempts to do something similar, and outputs HTML files containing both code and figures. However, there are a few drawbacks: it uses its own Markup text layout language, and GitHub (where I intend to host my notebooks) does not natively render html.
Luckily, some awesome people have made it really easy to generate IPython notebooks using Matlab, that are super easy to share or host on GitHub. Here’s the step-by-step guide:
- Download and install Anaconda https://www.continuum.io/downloads. Restart Terminal. Or, if you’d prefer to not get the full Anaconda software, check out this post.
- In terminal, type
pip install pymatbridge
pip install matlab_kernel
python -m matlab_kernel install - Point the kernel to your version of Matlab. I added
export MATLAB_EXECUTABLE=/Applications/MATLAB_R2015b.app/bin/matlabto my .bash_profile file. To do this from Terminal, typeecho “export MATLAB_EXECUTABLE=/Applications/MATLAB_2015b.app/bin/matlab” >> ~/.bash_profile. Of course, make sure the location and version of Matlab match yours. - Restart terminal or load
.bash_profile. Typeipython notebookin Terminal. Your browser will open a Jupyter window, where on the right hand side you can go to New -> Notebooks -> Matlab. - You’re now ready to run your notebook! Simply write or copy a block of code from matlab, and click Run. The figures will automatically appear when you are calling any plotting function. When you push your Notebook.ipynb file to GitHub, it will automatically render the layout and figures. You can also download the whole notebook to HTML which can be viewed in any web browser.
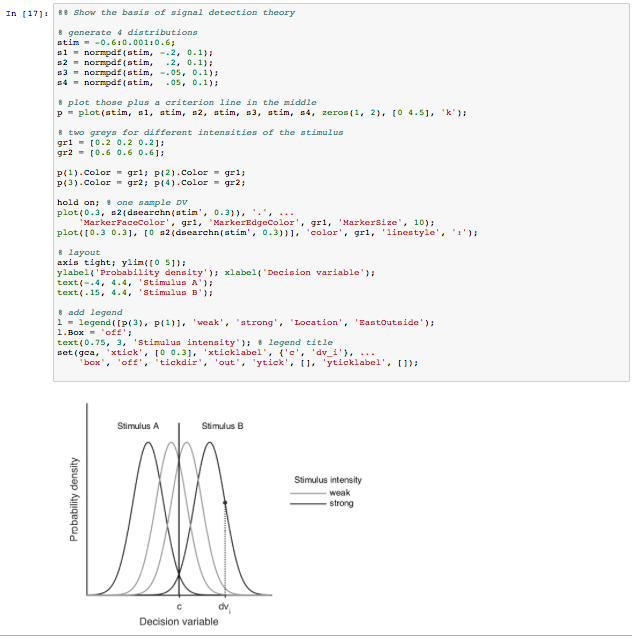
See here for an example notebook, analysing some pupillometry data in Matlab. Here’s a screenshot of a notebook on signal detection theory:
This code works on a Mac OS X El Capitan, and requires some familiarity with Terminal.

Hey! Thanks for this post. One suggestion: In point 3, it’s very easy to miss the “export” command. It’ll be probably helpful if you reformat the line.
Thanks for your tip, I updated the post.
Cool. I didn’t realise it worked with plots. Are you finding this to be reliable and robust?
Does this work also when only the Matlab runtime (MCR) is installed? Think of making jupyter notebooks available for students who can’t afford to buy a Matlab license. Thanks.
Once a Jupyter notebook has been created it can be viewed by anybody through a web browser – much like an html file with figures included (eg, from the developer of the matlab_kernel, https://github.com/Calysto/matlab_kernel/blob/master/matlab_kernel.ipynb). To generate the notebooks, however, you very probably need to point the kernel to a full version of Matlab. Note that I’m not the developer of any of these tools, so you might want look up the original source code for more specifics.
If Octave covers your needs, you can use octave_kernel instead by doing this:
“pip install octave_kernel
python -m octave_kernel.install”
Got from:
https://github.com/Calysto/octave_kernel
That was quick 😉 Thanks.
Yeah I am aware about the portability. I was thinking to use it with the grading function of Jupyter…give students task to fulfill. And if they would need a full Matlab install on their machines that would be a major show stopper. Thanks again.
I see! I didn’t know about the grading function but it looks very useful indeed. I’m afraid I can’t really help you, but if you manage to get this to work I’d be very happy to know.
everything installed fine. tried creating a new notebook, but “Notebooks” under “New” is grayed out. Halp.
There is one thing missing from the instructions above to get this working in my system, perhaps that helps to you too.
Just add “python -m matlab_kernel.install” after the installation of matlab kernel (pip install matlab_kernel)
I found that info from the instructions on how to install matlab_kernel: https://pypi.python.org/pypi/matlab_kernel
Hope it helps!
It worked! Thank you so much!
Thanks, I added this to the instructions.
Jupiter is amazing. Great to hear people find the way to get there from Matlab. Is there a way to have these libraries working on Windows?
I just followed the instructions on Windows. The only difference is how to point the kernel to Matlab. In Windows you can do it under Control Panel > System. I was able to create a Matlab notebook. So far it’s writing “Connected” every few seconds. I tried to run a command but it’s taken 10 minutes now (usually it takes 30 seconds). I’m giving it some more time 🙂 If it works I’ll write a blog post on it.
The problem why it tried to reconnect every few seconds was a virus scanner. Now it works (sometimes :)).
This resolved my issue: http://stackoverflow.com/a/39620479/1117932 (it was not MATLAB related)
Would you be willing to say a little more about what you did under Control Panel > System to get this to work? I am not sure how to go about translating the final step for pointing the kernel into windows terms.
Hi Vera,
if you go to the control panel, type “Environment” into the search bar, then the link “Edit the system environment variables” should appear. Click on it and enter username and password for an admin account (can be your user). Click on environment variables and click “New…”. Give it the name “MATLAB_EXECUTABLE” and enter the path to your matlab. This is “C:\Program Files\MATLAB\R2014a\bin\matlab.exe” in my case. (you have to use quotes!)
Does this work for you?
Best regards,
Verena
I followed the instruction, but it did not work for me. I tried to run a cell of Matlab code but nothing happens, although the current kernel was set as Matlab. Please help!! I am using a Mac OS X El Capitan.
@ Oanh Vu I had the same problem (spent 2 days trying commands in the Terminal). The tricky part is pointing your version of Matlab (you check the version at “Macintosh HD”/Applications/MATLAB_R2015a or perhaps 20XXb or something).
once you know what version of MATLAB you can automatically edit *.bash_profile*
by pasting:
echo “export MATLAB_EXECUTABLE=/Applications/MATLAB_2015b.app/bin/matlab” >> ~/.bash_profile
into the terminal
then restart the terminal
check that your ~/.bash_profile is successfully edited with
open ~/.bash_profile
So cool! Thanks a bunch
That’s real cool, and yes, sometimes do see my self using Jupyter notebooks for some old Matlab code.
My own experience through (after failing to port some old codebase Matlab->Python) – I was able to port my Matlab libraries to Julia language, the code is clearer, faster, and supports Jupyter notebooks. I’d give it a try (the example above is easily recoded there [ using eg: https://github.com/JuliaStats/StatsFuns.jl ]
How could I load functions as I do in Matlab software?Thanks!
Try the steps outlined here: http://am111.readthedocs.io/en/latest/jmatlab_use.html#User-defined-functions.
For an example: https://github.com/varunsmurthy/JupyterKernelTests/blob/master/Matlab/matlabKernel.ipynb
Thank you so much! You saved me hours!
Thanks for the helpful instruction! I think we need to install Matlab Engine API for Python:
https://www.mathworks.com/help/matlab/matlab_external/install-the-matlab-engine-for-python.html